Testing the concept: how we decide on the next killer app
With so many ideas (like InStock), how do we test the viability of new business opportunities and see if they stick before we invest the time in developing them? We have a couple of tricks up our sleeves to share with you that saves us both time and money and keeps us focussed on success.
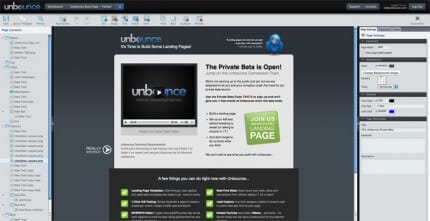
Firstly we make use of two excellent online tools. Google Adwords and an awesome service called unbounce.com which, although designed for A/B testing, makes an excellent platform for soft testing our new business ideas. The main premise for the service is that you can setup a slick designed landing page in about 30 minutes and then use A/B testing to fine tune variations, instantly seeing the results. Then we apply the following 4 simple steps.
1. The Idea
We are always coming up with ideas, in fact we currently have an ideas board with about 20-30 undeveloped ideas awaiting this very process. So, the very first thing we do, is sit on the idea. When we first come up with an idea we are all passionate about it but as time passes sometimes we realise we were caught up in a moment of enthusiasm and actually the idea won't cut it. Then at random intervals Colin, Simon and I go through the list and prioritise based on market factors and collectively what we are most passionate and excited about. Simple, and effective. There is no point developing something unless all three of us are passionate and believe in the idea and our experience helps us identify what is worth pursuing at this stage.
2. The one-sentence-sell
Once we have selected an idea, we try to come up with the one-sentence-sell for the product. The one-sentence-sell is a concept I picked up from Ryan Carson when I attended his startup seminar at Carsonified a couple of years ago. The idea is that you come up with a short sentence that both summarises and sells you business idea in one. Going through this process gets you thinking about your Unique Selling Points and provides you with all the material you will need to test the idea.
3. Soft testing the idea
Our main testing approach is to use Google Adwords, this allows us to not only test our one sentence sell which can then be refined into the product's tag line, but also allows us to refine target keywords. Unbounce.com comes in really handy as it not only helps us create a compelling landing page in minutes that can be used to point the Adword Ads at. Unbounce.com also allows us to test variations of the landing page from a business model perspective as well as a design perspective. For example, although we are big advocates of the Getting Real approach of stripping a product down to the bare minimum, Unbounce.com allows us to A/B test different feature ideas, domain names and even pricing. It's excellent statistics provide you with a break down of visitors, page views and conversions per variation. The key to getting good results out of A/B testing is to only test one variations at a time, but the process really allows us to hone in on not only how best to sell the app or what features to include but also based on the conversion rate gives us a bigger picture on whether to take the idea forward and build it.
4. Finally the added benefits
The great thing with taking this approach is that you can go ahead and build ideas confident in knowing that you already have a number of users from your converted leads wanting to use your service, you have an early online presence for the idea that helps you build traction and pagerank and you can also make use of it to test out ideas that arise during the development process.
The process is simple and cheap. You are in complete control of you Adword budget, though I advise investing a larger amount for a short period than running a long term campaign at a low rate like £1 ($1.60ish) a day. You can stop and start your ad as needed so focus on short and snappy tests. Unbounce.com offers a free plan for up to one domain being tested and has a range of good value premium plans from $25 a month.
We are currently testing http://www.instockapp.com, please feel free to check it out.
The most lightweight audio player for OSX
I had an issue. iTunes is a fine program, with loads of great features, and it's essential for the iTunes store and syncing my iPhone. Trouble is, in my house, we've got a central media server which reports 1037 albums - pulled from the CD collections of four music lovers. The combination of network access and a huge number of songs means that iTunes does get a little sluggish. I've tried alternatives - Songbird, Picoplay, Cog - but to be honest I want something that's fast as lightning and I'm not really interested in the library features of iTunes.
I've written a very rough and ready Objective-C media player. It sits as an OSX menu icon, near the spotlight and airport icons, and allows you to pick a directory of audio files to play. That's pretty much it. You can choose "pause", "skip" and "quit" to control the player, but there's no notifications, libraries, fancy features or airs and graces.
I want to thank Matteo Bertozzi for teaching me how to create the system bar items, and P.J. Onori for the icon from the Iconic set which I used. I'm using this player daily, so it works for me, but we're putting it in our labs and it's on github, so please fork the audioplayer repo if you have any features you want to add.
Updated 19/3/2010: The audioplayer has been renamed Euphony, so I've updated the links accordingly.
How we track projects
Depending on time of year, current workload, phase of moon, and other factors, the Go Tripod team may not always work from the same location. And even if we do, we're often in Do Not Disturb mode with headphones on. We've found that the best way to keep track is by using the Campfire chat system, which allows not only standard back-and-forth yapping, but sharing of source code and images. A killer feature for us is the ability to see what's been talked about if we've not been in the chatroom for a few hours; Campfire offers transcripts of everything that's been said in your absence.
So we're always in Campfire, and it's an integrated part of our working day. As Go Tripod is going from strength to strength, we've started to need a way of doing a similar thing with projects - a very simple way for anyone to see and overview of projects that are on the go right now. We've kind of tried this before, but the stuff that we've tried either hasn't been simple enough or we've only used it rarely because it's separated out from every other part of our work. In the latter case, it just gets left by the wayside and forgotten.
The idea sprang to mind to somehow involve Campfire in the proceedings. Maybe we change the room title to reflect the current open projects? The problem with the room title is that it's a bit out of the way up the top of the screen and could be affected by the same issue as I described above - out of sight, out of mind. So the solution needed to be integrated. In fact we basically needed another team member in Campfire, our communication method of choice, talking to us and updating us. Some kind of automated team member... Some kind of robot?
The Technical Bit
I did a quick search - Tim Riley's Campfire Bot looked absolutely perfect, with its plugin system, so I tried to use that. Unfortunately I couldn't get the latest source code to work, and I had other issues when I tried to use the Tinder library which underlies the Campfire Bot.
A quick scout around for some more libraries led me to Broach, a simple wrapper for the Campfire API, and the 37 Signals example code for the Campfire Streaming API, which uses the twitter-stream library. I quickly put together a proof of concept using these tools and some sneaky code which allowed us to issue commands to the bot from the Campfire window itself.
The Results
A picture tells a thousand words:

A list of current projects! And Simon decides to add another:

GoTripodBot is a helpful fellow:

And a brief insight into the world of development (I wrote some unit tests after this):

Conclusion
Of course there's a lot more to our project management process than this (and a lot more projects to manage than I've shown!) but having such easy transparency into this top layer of our work is really going to improve our awareness of what's happening right now in the world of Go Tripod.
Ext JS 3.0 cookbook - available now
The Ext JS 3.0 Cookbook by Jorge Ramon is now available. As Jorge says in his introductory post:
The Ext JS 3.0 Cookbook is for developers who want a book of useful techniques, with explanations, that they can refer to and adapt to their purposes.
I was a Technical Reviewer for this book, and it contains not just simple recipes to get you started, but complex ones to allow you to bend Ext JS to your will. If you buy Ext JS 3.0 Cookbook eBook along with the eBook edition of the book I co-authored, Learning Ext JS, you can get a 50% discount using the promo code jsco34ler on the Packt website. Congratulations Jorge!
Problem solving in software
Very occasionally, people will start asking me in detail what I do for a living. When "I write software" or "I make websites" doesn't satisfy them, I go into a bit more detail about the different aspects of my job. One thing that happens quite regularly if I don't go into enough detail, is that I'll tell someone how long it took to write something, or how much it cost, and they'll raise their eyebrows.
"How can it cost so much?! It's just a website!"
I can see their point. Most websites contain common elements - login, lists, articles, shopping carts, and so on - so you'd think that once you've written one, you'll have the bits and pieces you need to make more. And taken individually, each of these parts are fairly straightforward - a list of products contains some pretty basic HTML, surely? And HTML is just a text file?
And again, that's a fair point. The real time isn't taken in writing these bits and pieces, it's taken in understanding how the customer wants them to be written and how they need to fit together in a certain situation. For example, a shopping cart quickly becomes more complex when the customer adds on a few more features:
- Integrates with Google Checkout
- Customers can save carts for later ordering
- Customers can reload past orders into a few cart
But it's not just the cart, it's viewing products too - what if certain customers see custom trade prices? Or products can be assigned to multiple categories and the customer wants to see how many products are in each category next to the category name? All of these things are minor when taking in isolation, but together they are a thousand tiny cuts which bleed development time.
As well as a collection of features, a specification for a website will also discuss requirements in language which is specific to the company you're quoting for. Rather than "cart" you might have "basket". Or you could have "assessors", "reviewers", "investigators", or any other number of terms which a company uses internally and when referencing all of the features they want on their site. Eric Evans talks about the "domain" of a problem when discussing software - not only do you have to appreciate what kind of features are necessary but you have to understand the domain in which they're going to be used, in order to create a solution which fits together correctly.
So software is a whole big bag of questions and clarifications and solutions. From a developer's point of view, it's not just a case of taking some standard components and piecing them together - though that does happen occasionally. Instead every step of the development process is about solving problems, by understanding what the customer wants and by understanding the problem domain. Every day of development sees a developer tackle a new bit of work that needs resolving in a novel way, and that's why making software isn't just a case of shoving some parts together and hoping that it works, but a process, an evolution of the initial ideas.
When clients come to us and ask for software, they'll pitch it by saying "make us a website". But we know that what they really mean is "look, understand, and solve our problem". And that's what we do.
Dynamic nested forms in Rails 2.3+ Using RJS
Rails 2.3 delivered a new feature that allows you to easily write forms in rails that can process nested attributes for related objects using the accepts_nested_attributes_for method in your models. Now there is a plugin to make adding and removing nested forms a walk in the park!
I am not going to go into detail about this feature as Ryan Daigle has an excellent write up on his blog.
However I have been looking at ways to easily add and remove nested form blocks using Javascript/RJS and came across a good method of achieving this by Marsvin on the RailsForum website.
We have used this method a few times now, so thought we would roll it up into a plugin. Simply install the plugin to give you two new view helpers that allow you to create links to add and remove these nested form item partials using RJS.
Visit the plugin's page on GitHub to install or view the documentation.
ASP.NET SMTP - Setting a pickup directory for development
One of the hidden gems of System.Net is the ability to change from using an SMTP server for sending your email. Instead you can specify a pickup directory which will receive all emails sent from your application as a .EML text file. There are clearly uses for this in production - you may have a second application which monitors this pickup directory and sends the emails after performing some processing on them.
My favourite use of this feature is for development - when you're sending loads of test emails you can avoid polluting your inbox and simply check the pickup directory. You also avoid having to set up an SMTP host and all of the associated configuration.
Simply add the following to your web.config's system.net section:
<mailSettings>
 <smtp deliveryMethod="SpecifiedPickupDirectory">
 <specifiedPickupDirectory pickupDirectoryLocation="c:temp"/>
 </smtp>
</mailSettings>
Make sure you've got the right permissions on the directory. Now, send an email from your application and watch it appear in c:temp, as if by magic!
Scale-9 in Objective-C Cocoa on the Mac
Having used flash extensively for the last few years I have really come to rely on using Scale-9 scaling on UI elements in the rich internet apps I design and develop. It is a great technique for things like rounded rectangles, button graphics etc and ensuring the rounded corners do not distort when stretched.
I have recently been doing Cocoa Development on Mac OS X 10.5 and was looking for a way to do this in Cocoa and came across a great drawing method named NSDrawNinePartImage. The method has the following signature:
void NSDrawNinePartImage(NSRect frame,
   NSImage *topLeftCorner,
   NSImage *topEdgeFill,
   NSImage *topRightCorner,
   NSImage *leftEdgeFill,
   NSImage *centerFill,
   NSImage *rightEdgeFill,
   NSImage *bottomLeftCorner,
   NSImage *bottomEdgeFill,
   NSImage *bottomRightCorner,
   NSCompositingOperation op,
   CGFloat alphaFraction,
   BOOL flipped
);
This method requires the developer to provide 9 separate images to create the 9 sections of the scale 9 image. Luckily the article I had stumbled across had a handy example for using a single class, so I thought that I would use their technique to create a simple generic class that can be used to draw a single NSImage as a Scale-9 scalable image. This could be used for example in an NSView or NSButtonCell.
//
//  GTDrawImage.m
//  StretchMyView
//
//  Created by Jon Baker on 17/06/2009.
//  Copyright 2009 Go Tripod Ltd. All rights reserved.
//

#import "GTDrawImage.h"

@implementation GTDrawImage

+(void) drawScalableImage:(NSImage *)sourceImage scaleTopLeft:(NSPoint)topLeftPoint scaleBottomRight:(NSPoint)bottomRightPoint inFrame:(NSRect)frame
{
	NSSize sourceSize = [sourceImage size];

	// Top left
	NSRect topLeftTileRect = NSMakeRect(0, 0, topLeftPoint.x, sourceSize.height - topLeftPoint.y);
	NSRect topLeftCutRect = NSMakeRect(0, topLeftPoint.y, topLeftTileRect.size.width, topLeftTileRect.size.height);

	// TopRight
	NSRect topRightTileRect = NSMakeRect(0,0, sourceSize.width - bottomRightPoint.x, topLeftTileRect.size.height);
	NSRect topRightCutRect = NSMakeRect(sourceSize.width - topRightTileRect.size.width, topLeftPoint.y, topRightTileRect.size.width, topRightTileRect.size.height);

	// Top
	NSRect topTileRect = NSMakeRect(0, 0, sourceSize.width - topLeftTileRect.size.width - topRightTileRect.size.width, topLeftTileRect.size.height);
	NSRect topCutRect = NSMakeRect(topLeftPoint.x, topLeftPoint.y, topTileRect.size.width, topTileRect.size.height);

	// Bottom Left
	NSRect bottomLeftTileRect = NSMakeRect(0, 0, topLeftCutRect.size.width, bottomRightPoint.y);
	NSRect bottomLeftCutRect = NSMakeRect(0, 0, bottomLeftTileRect.size.width, bottomLeftTileRect.size.height);

	// Bottom Right
	NSRect bottomRightTileRect = NSMakeRect(0,0, topRightCutRect.size.width, bottomLeftTileRect.size.height);
	NSRect bottomRightCutRect = NSMakeRect(topRightCutRect.origin.x, 0, bottomRightTileRect.size.width , bottomRightTileRect.size.height );

	// Bottom
	NSRect bottomTileRect = NSMakeRect(0,0, topTileRect.size.width, bottomLeftTileRect.size.height);
	NSRect bottomCutRect = NSMakeRect(topCutRect.origin.x, 0, bottomTileRect.size.width, bottomTileRect.size.height);

	// left

	NSRect leftTileRect = NSMakeRect(0, 0, bottomLeftTileRect.size.width, sourceSize.height - topTileRect.size.height - bottomTileRect.size.height);
	NSRect leftCutRect = NSMakeRect(0, bottomRightPoint.y, leftTileRect.size.width, leftTileRect.size.height);

	// right

	NSRect rightTileRect = NSMakeRect(0, 0, topRightCutRect.size.width, leftCutRect.size.height);
	NSRect rightCutRect = NSMakeRect(bottomRightPoint.x, bottomRightPoint.y, rightTileRect.size.width, rightTileRect.size.height);

	//center
	NSRect centerTileRect = NSMakeRect(0, 0, topTileRect.size.width, leftTileRect.size.height);
	NSRect centerCutRect = NSMakeRect(topCutRect.origin.x, bottomRightPoint.y, centerTileRect.size.width, centerTileRect.size.height);

	NSImage *topLeft = [[NSImage alloc] initWithSize:topLeftTileRect.size];
	[topLeft lockFocus];
	[sourceImage drawInRect:topLeftTileRect fromRect:topLeftCutRect operation:NSCompositeCopy fraction:1.0];
	[topLeft unlockFocus];

	NSImage *top = [[NSImage alloc] initWithSize:topTileRect.size];
	[top lockFocus];
	[sourceImage drawInRect:topTileRect fromRect:topCutRect operation:NSCompositeCopy fraction:1.0];
	[top unlockFocus];

	NSImage *topRight = [[NSImage alloc] initWithSize:topRightTileRect.size];
	[topRight lockFocus];
	[sourceImage drawInRect:topRightTileRect fromRect:topRightCutRect operation:NSCompositeCopy fraction:1.0];
	[topRight unlockFocus];

	//setup center section, left, right
	NSImage *left = [[NSImage alloc] initWithSize:leftTileRect.size];
	[left lockFocus];
	[sourceImage drawInRect:leftTileRect fromRect:leftCutRect operation:NSCompositeCopy fraction:1.0];
	[left unlockFocus];

	NSImage *center = [[NSImage alloc] initWithSize:centerTileRect.size];
	[center lockFocus];
	[sourceImage drawInRect:centerTileRect fromRect:centerCutRect operation:NSCompositeCopy fraction:1.0];
	[center unlockFocus];

	NSImage *right = [[NSImage alloc] initWithSize:rightTileRect.size];
	[right lockFocus];
	[sourceImage drawInRect:rightTileRect fromRect:rightCutRect operation:NSCompositeCopy fraction:1.0];
	[right unlockFocus];

	NSImage *bottomLeft = [[NSImage alloc] initWithSize:bottomLeftTileRect.size];
	[bottomLeft lockFocus];
	[sourceImage drawInRect:bottomLeftTileRect fromRect:bottomLeftCutRect operation:NSCompositeCopy fraction:1.0];
	[bottomLeft unlockFocus];

	NSImage *bottom = [[NSImage alloc] initWithSize:bottomTileRect.size];
	[bottom lockFocus];
	[sourceImage drawInRect:bottomTileRect fromRect:bottomCutRect operation:NSCompositeCopy fraction:1.0];
	[bottom unlockFocus];

	NSImage *bottomRight = [[NSImage alloc] initWithSize:bottomRightTileRect.size];
	[bottomRight lockFocus];
	[sourceImage drawInRect:bottomRightTileRect fromRect:bottomRightCutRect operation:NSCompositeCopy fraction:1.0];
	[bottomRight unlockFocus];

	NSDrawNinePartImage(
						frame,
						topLeft, top, topRight,
						left, center, right,
						bottomLeft, bottom, bottomRight,
						NSCompositeSourceOver, 1.0, NO);

	[topLeft release];
	[top release];
	[topRight release];
	[left release];
	[center release];
	[right release];
	[bottomLeft release];
	[bottom release];
	[bottomRight release];
}

@end
To use this generic classes, you simply need to import it where required:
#import "GTDrawImage.h"...and then you can call from within, for example the drawRect:, selector using the following method:
- (void)drawRect:(NSRect)rect {
	[GTDrawImage drawScalableImage:baseImage scaleTopLeft:NSMakePoint(8, 16) scaleBottomRight:NSMakePoint(16,8) inFrame: [self bounds]];
}
drawScalableImage takes an NSImage, in this case baseImage, and two reference points (NSPoint) to split the image into nine slices, firstly the scaleTopLeft: and secondly the scaleBottomRight:, both located from the bottom left corner. So for example to split a 24px x 24px image into 9 equal 8px by 8px segments (see below), the topLeftPoint would be x=8px, y=16px and the bottom x=16 and y=8.
Just download the following classes into your projects and away you go:
- Header: GTDrawImage.h
- Implementation: GTDrawImage.m
- Sample Project using GTDrawImage: StretchMyView.zip (Adapted example I found. Unfortunately I can't remember where and so don't know who to credit)